Step-by-step guide: creating labels
How to create labels with QR codes for your machines in Label Artist – matching our 75 × 52 mm template.
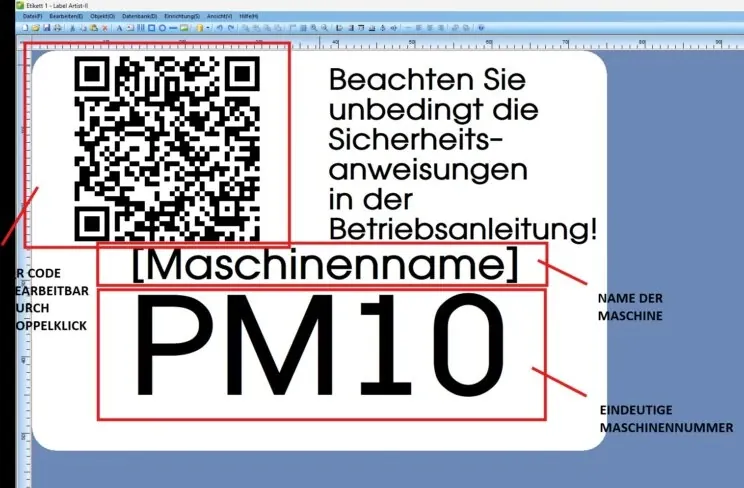
1. Create a new label
- Open Label Artist.
- Choose File → New in the menu to start a new label project.
- Define the label size (e.g. 75 × 52 mm) and click OK.
We recommend labels in this size; our template is designed for it.
2. Insert the QR code
- Go to Object → Barcode → QR code.
- Click on the label to place the QR code.
- Double-click the QR code to edit it:
- Enter the URL of your machine or information.
- Make sure the encoding is correct (UTF-8 recommended).
3. Add a safety note
- Choose Object → Text.
- Write, for example:
Always follow the safety instructions in the operating manual!
- Adjust the font size and position.
4. Add machine data
- Insert two separate text fields:
- [Machine name] → e.g. "Croissant former"
- PM10 → unique machine ID
- Use a large, easily legible font (e.g. Arial Black, 72 pt for the number).
(PM = production machine, VM = packaging machine, FB = conveyor belt)
5. Arrange the elements
- Align the QR code, texts and number in a visually pleasing way.
- Leave enough margin and distribute the elements evenly.
6. Save and print
- Save your label via File → Save as.
- Choose a suitable printer via File → Print, e.g. a label printer.
Which solution suits your business?
Free and without obligation: together we clarify which requirements apply to your business and the fastest way to a complete risk assessment.